Hello visitor! I haven't blogged in many years, so I thought I'd kick start a new era of blogging with a tutorial series on how to make bots with the recently released pysc2.
I'm not a great programmer in any way, but neither is this a tutorial on how to program, so I will assume you have basic knowledge of python. You will likely also want some familiarity with working with matrices in python via numpy, but maybe not. I actually explain many of the numpy things in some detail, since the Deepmind coders do stuff in one line i would need a bunch of lines to do. But please tell me if there's something you want me to explain further!
Without further ado, let us get cracking.
Introduction: humans are amazing
Imagine yourself standing on the street. You take in your surroundings, your senses send signals to your brain, while your brain sends signals back to your senses, telling them what they should see, and you decide to...
Well, what would you like to do? So many things you could choose. That thing about brain sending signals back to your senses is a real thing by the way. And there are more of these connections than those going from your eyes to your brain, implying that we indeed see what we want to! (See here for an example).
Makes you think doesn't it? (pun intended) However, we shall not dwell on that subject more (although it is part of my research if you'd like to know more).
So, back on the street again, let's simplify the scenario. You can only take discrete steps. For every step you take (and every move you make), you look around and decide on an action based on what you see (we shall disregard imagination for now, you only make decisions based on your surroundings). What would you do and how would you reach that decision?
This is still a very complicated scenario, as the real world is filled with many wondrous and horrible things and we can choose to interact with our world in even more combinations.
Let's simplify even more, to the scenario of playing a video game. This is a much more constrained space of possible observations, it's governed by rules we know and the actions we can take in that game are pre-defined.
In my field of research, we use video games as experimental settings to try and understand how humans make decisions and use that knowledge to improve the capabilities of artificial intelligence.
Which takes us to StarCraft 2. It's a so called Real Time Strategy (RTS) game, where you gather resources to build a base and enough units to destroy your enemy. It's like Chess but in real time and way more complicated as the combinations of possible things to do are way more than in Chess.
It's a lovely game, I especially like the colors and sounds of the Colossus unit's energy beams as they disintegrate pathetic Zerglings trying to come close enough to bite.
This is not a Colossus disintegrating Zerglings, but I think giraffes are more amusing anyway.
How do we learn to play a game like StarCraft 2 (SC2)? If you think about it, it's crazy that anyone can learn to play something that complicated. Yet here we are, with huge tournament prizes for being the best SC2 player in the world. And, you know, since we can learn to read and write, play football, play musical instruments, climb Mount Everest and go to the fucking moon, maybe playing SC2 isn't that big of a deal, right?
Actually, all of our assumptions so far have relied on that we know how to interpret our sensory signals and how to perform actions like moving our arms, pressing buttons and so on. Which is something babies have to learn how to do (and there are different opinions on how much innate knowledge we have at birth).
That's not even the whole story. If you take the approach of embodied cognition, human behavior is not just input-brain-output. It's a brain in a body in an environment and our behavior is an emergent phenomenon in the interaction between those three systems (which themselves contain many different subsystems).
So, you know, to create an experiment closer to how humans learn to play StarCraft, we should do something more complicated. Like, creating a Minecraft bot that learns how to use its body, navigate and survive in its environment, and then learns to play SC2. An artificial intelligence agent embedded in its world (Minecraft), learning to play a game (SC2).
Confused? Yeah, now you know why there's so much confusion in the psychology and neuroscience fields. It's a complicated subject. Now that you know that, building a bot will feel so easy :)
So forget all I just said. Don't think about the incredible complexity of human behavior for a moment and lets get down to the business of creating a bot that can play SC2.
pysc2 - a love story between Blizzard and Deepmind
If you're not familiar with StarCraft II, I highly recommend trying it out. Not only is it fun, but you'll also be able to understand this tutorial better. You can try the free Starter Edition on Battle.net. You can actually use the free starter edition for this tutorial!
pysc2 is Deepminds python wrapper of Blizzard's sc2 api. This is nice for people like me who don't know much about C++, and also because python has access to so many great libraries for neural networks and data science. Additionally, pysc2 was made specifically as a reinforcement learning environment. To know more, read the paper. I don't think you have to read that to follow along in this tutorial but it will likely help you get a feel for how the framework...works.
However, an issue is that the documentation for pysc2 is not great. It mentions the main concepts but is low on detail, so for a fool like myself it was not easy to understand how to go about making my own bot. But I want to use this in my own research so I need to understand this whole thing. And might as well share my findings in case it helps anyone.
Installation
The instructions on the official pysc2 Github page are clear and helpful. It's fairly easy to get started if you ever used pip before to install something.
But in short, if you're on Windows or Mac, install StarCraft II with the standard installer. If you're on Linux, there's a special version for you on Blizzard's Github.
Then you need python, which you can download from the official site. The latest version, 3.6, should work fine.
When you have installed those two, open a command prompt (Win) or terminal window (Mac) and do a:
$ pip3 install pysc2(Or just pip if you have python2) When that is done, download the maps and Deepmind mini games and extract those to your StarCraftII/Maps/ folder.
You should now be able to do a test run using:
$ python -m pysc2.bin.agent --map Simple64That's it. This procedure was all I needed for installing on a Windows 7 machine. Your mileage may vary, as usual when computers are involved.
Overview of the framework
Following on from the story about yourself walking around the streets making people uncomfortable, it's worth repeating the three basic conceptual terms we're going to refer to over and over again:
- agent - yourself in the street walking analogy. Here it is another name for bot, which in turn means automated player
- observation - your surroundings on the street at a discrete point in time. The state of the world (game) at a certain time point
- action - waving to someone, walking down the street. Commands sent to the game
Worth noting is that in reinforcement learning (next lesson), the algorithms usually speak of states (s) and actions (a) instead of observations and actions. But we'll get to that in the next lesson.
Other important terms are:
- episode - one full training round, usually one episode is from the start of the game to its end and/or when a reward is received. So to use our walking down the street scenario, one episode could be you walking down the street and successfully getting on the bus to work. The next episode would be the next day when you try to do the same thing. This may sound silly, but maybe you just moved into this house and it's the first time you're going to the bus stop. You need a few days - a few episodes - to learn the route to the bus stop.
- step - An episode can contain many steps. Each step is basically Observation -> Decision -> Action. Then we move onto the next step.
- reward - Each action taken can lead to reward. Sometimes that means the end of the episode (getting on the bus can be the reward). It could also be that you get a reward for reaching checkpoints along the way to the bus stop, and getting on the bus is the end of the episode. The goal is to maximize your reward over time.
On a conceptual level, pysc2 provides an "environment" for an agent. pysc2 takes care of starting up the game, waking up your agent and works as the intermediary between your agent and the game. pysc2 gets observations from the game, sends these to your agent, and your agent sends back actions through pysc2 to the game itself.
Observations
Since StarCraft 2 is a complicated game with lots of information, Deepmind has scaled all of this down. Instead of getting the entire screen contents in full resolution, we have two main things; the screen and minimap.
The blue box is the screen and the yellow box the minimap.
The game screen we get each observation is not in full resolution. The default here is that the entirety of that game screen is scaled down to an 84x84 matrix. Which is very small and it would be close to impossible to discern any useful details in all that. So, instead of all 1920x1080 RGB pixels being scaled down to 84x84, we have what is called 'feature layers'. One feature layer for example shows only the units you currently have selected, by giving you an 84x84 matrix where 0 is background and 1 is a selected unit. Important to note is that since it's a scaled down image, one unit can cover more than one pixel/one position in the 84x84 matrix. Another feature layer shows the health of units on different parts of the screen.
The same goes for the minimap, it has feature layers like this as well, and the default size for that matrix is 64x64 (i think?). You can read more details in environment.md if you'd like.
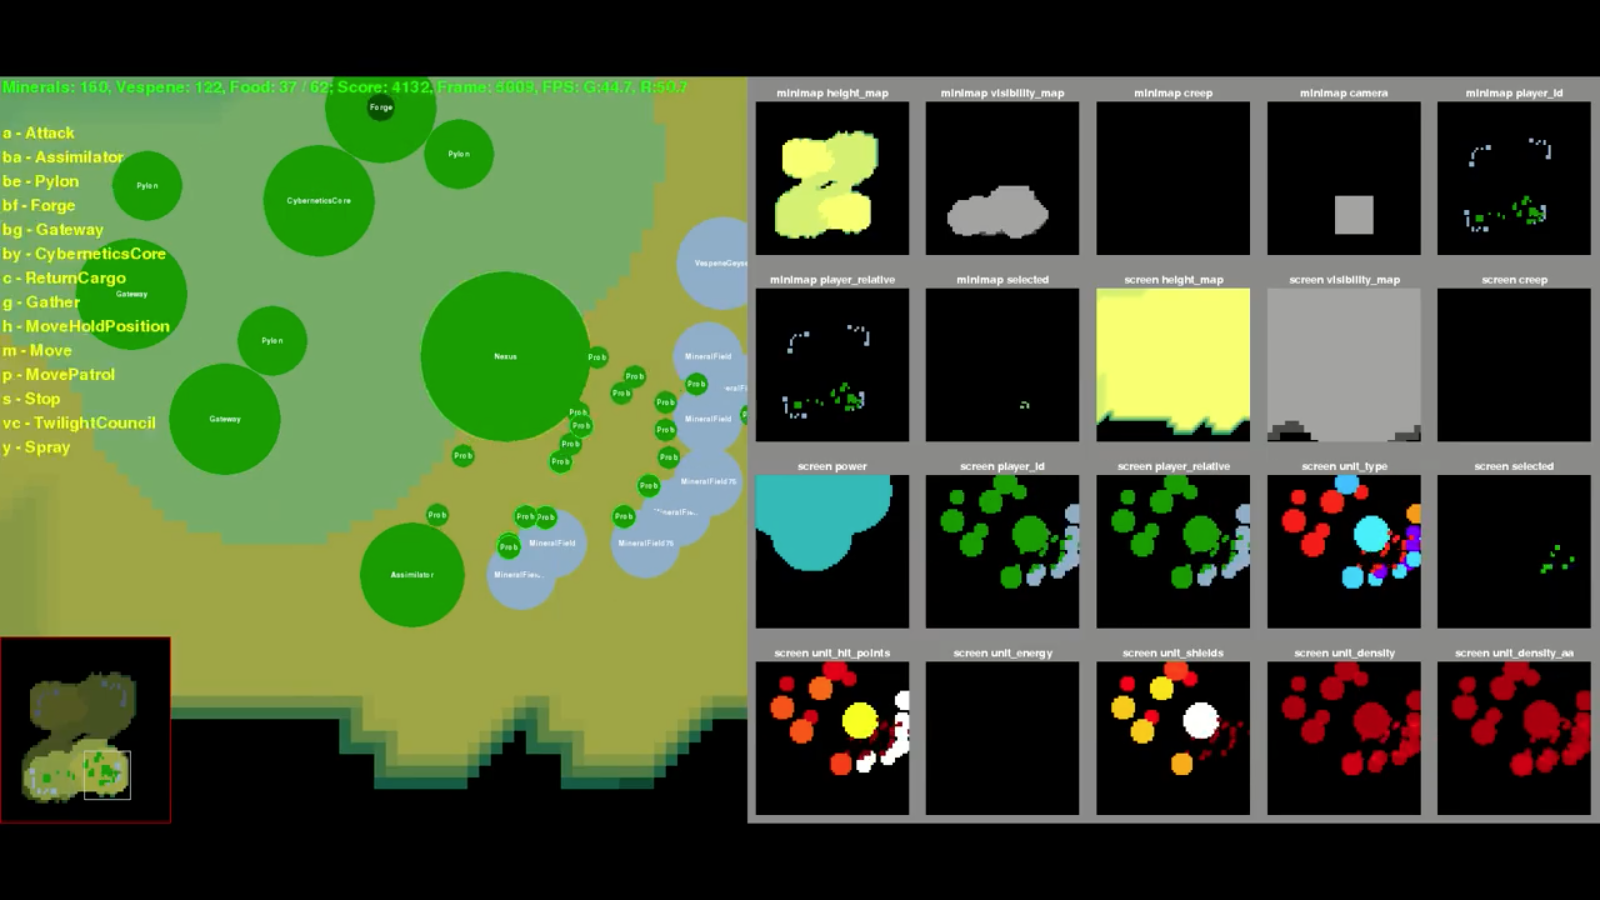
This is the pysc2 UI, where you can see all the different feature layers on the right and a very basic graphical representation of the game to the left. Click the image for a larger version.
Actions
The amount of possible actions are potentially enormous. So Deepmind has discretized these as well. Based on actions taken by human players in thousands of games, they have defined around 500 actions. For example you have actions to select units, move units, pan around the map and so on. We will go into more detail about how these are used later, but if you're curious you can check out what they say about actions in the official documentation).
Putting it together
When we start a mini game or map with pysc2, it boots up StarCraft II and uses a run loop to go through all episodes and steps within those episodes. The run loop can be found in pysc2.env.run_loop and if we try to write that in pseudocode, the run loop in pysc2 is something like this:
number_of_episodes = 50
env = start starcraft2
map = load map MoveToBeacon
agent = setup some agent
while number_of_episodes not 0:
  goal_reached = False
  while not goal_reached:
    obs = environment.update()
    action = agent.step(obs)
    reward = takeAction(env)
    if reward == 1:
      goal_reached = True
  number_of_episodes -= 1
This isn't how it actually looks but I tried to make more understandable. Don't worry though if all of that doesn't make sense, the main thing to remember is that obs variable sent to the agent, as it contains all the observations for the current state/step. Inside of that variable we have a dictionary of all observations made, in obs.observations. This is not very clear in Deepminds environment.md so I've started an effort to update that in my forked repo version of the same file. You can find that here
Basically, to get for example all available actions in the current game state (some actions may not always be available, if you do not have any selected units you don't have access to the "move unit" command) we can do this:
available_actions = obs.observations["available_actions"]So, now that you know that we have observations and actions, how do we put these together to make decisions? Let us look at the provided bots for inspiration and understanding.
Step 1: understanding the scripted bots
Our first thing to do is to understand the scripted agents that Deepmind has provided. We shall start with the BaseAgent class which is found in the pysc2/agents directory, as the example agents we shall look at later all inherit from this class. We will also use it as our base class when we construct our own agent in a later lesson.
Case study 1: class BaseAgent
What does the BaseAgent do? Let's take a look at the entire BaseAgent class:
"""A base agent to write custom scripted agents."""

from __future__ import absolute_import
from __future__ import division
from __future__ import print_function

from pysc2.lib import actions


class BaseAgent(object):
  """A base agent to write custom scripted agents."""

  def setup(self, obs_spec, action_spec):
    self.reward = 0
    self.episodes = 0
    self.steps = 0
    self.obs_spec = obs_spec
    self.action_spec = action_spec

  def reset(self):
    self.episodes += 1

  def step(self, obs):
    self.steps += 1
    self.reward += obs.reward
    return actions.FunctionCall(0, [])
The first few lines are importing stuff from the future, in case you're running an older version of python. We don't really need to care about those. We're all using python3 now right?
Anyway, the next line is slightly more interesting:
from pysc2.lib import actionsThe actions module is important, as it's from here we gain access to all the possible actions we can do like selecting units, moving units, looking around the map and so on. But maybe that was obvious. All available actions in the base version of pysc2 can be found here and a general explanation here in the official documentation.
Let's move on to some actual interesting stuff, namely the BaseAgent class itself and the setup function:
class BaseAgent(object):
  """A base agent to write custom scripted agents."""

  def setup(self, obs_spec, action_spec):
    self.reward = 0
    self.episodes = 0
    self.steps = 0
    self.obs_spec = obs_spec
    self.action_spec = action_spec
The setup function is called by the framework to create an instance of the agent as we launch the game itself. It sets up internal variables for the total amount of points for reward, number of episodes and number of steps. Pretty straightforward.
The obs_spec and action_spec are called from the environment run loop and are there because different environments may have different observation and action specifications. We don't really need to care about those right now.
Next up is the reset function:
def reset(self):
  self.episodes += 1
This is called by the pysc2.env.run_loop before an episode starts, to increase the number of episodes this agent has experienced.
Finally, we have the step function:
def step(self, obs):
  self.steps += 1
  self.reward += obs.reward
  return actions.FunctionCall(0, [])
Every step that pysc2.env.run_loop (the environment) makes, the agent is sent the observations (obs) made in that step. The agent increases the number of steps, increases the reward with the one observed in the environment (0 if last step did not lead to reward and 1 if the last step did lead to reward). It then takes the action
actions.FunctionCall(0, []).
(For the observant and insightful reader you may wonder how many game frames that obs contains, every 1 frame rendered by the game or what? Well, it's complicated. In short, each step size is related to actions per minute. We may go into further detail in a later lesson, but for now you can read "game and action speed" in the official documentation.)
We'll get back to what that action call means in a minute. First let me explain that what this function basically does is the same as if you imagine yourself going out, closing the door behind you and walk out onto the sidewalk to stand there, staring into thin air. That's what we've gone through here, you walking out is the setup function. And now, you take a "step". Which means, you look around, your senses make observations, and you perform an action. Maybe that action is to take an actual step down the street. Maybe you wave at your neighbor across the street. Maybe you turn around and go back home because the world is a scary place.
How do you make the decision of what to do? Well, that's what neuroscience and psychology is trying to explain, so we won't go into that right now (even though this is also part of my research).
In our case, that part, the decision making part/logic is totally missing here. Which takes us to the action made here in BaseAgent:
return actions.FunctionCall(0, [])This is how you make an action, and why we needed to import actions from pysc2.lib earlier. The 0 is the action ID number and the brackets are the parameters for this action. Apparently, this action needs no parameters. If you've got your terminal handy, you can write the following to see all possible actions:
$ python3 -m pysc2.bin.valid_actions(If you use python2 you probably don't need the 3 there). In the output of that command, we get all actions, each action one line on the list starting from 0. Our function call is 0 (remember it was `return actions.FunctionCall(0, [])) so we only need to see the first few lines of that output:
$ python3 -m pysc2.bin.valid_actions | grep "" <(head -n 10)I'm sure there's an easier way to do that but it's what I managed to put together when using duckduckgo okay? That command won't work if you're on Windows so you'll just have to scroll up, sorry!
In any case, we get the following output:
0/no_op                                              ()
1/move_camera                                        (1/minimap [64, 64])
2/select_point                                       (6/select_point_act [4]; 0/screen [84, 84])
3/select_rect                                        (7/select_add [2]; 0/screen [84, 84]; 2/screen2 [84, 84])
4/select_control_group                               (4/control_group_act [5]; 5/control_group_id [10])
5/select_unit                                        (8/select_unit_act [4]; 9/select_unit_id [500])
6/select_idle_worker                                 (10/select_worker [4])
7/select_army                                        (7/select_add [2])
8/select_warp_gates                                  (7/select_add [2])
9/select_larva                                       ()
Here, the action ID is the number to the left, then we have the action name and to the right are the parameters for that action. So we see that we have the command no_op being returned every time by the BaseAgent. no_op being short for "no operation". That also explains why it needs no parameters.
In other words, BaseAgent does nothing. That's all right for a while you know, but what if you get hungry, just standing there on the sidewalk?
We learned lots about the basic concepts of a bot, though, right?
In the next chapter, we shall look at a so called scripted bot, which cannot learn but is specifically written for one of the mini games.
Case Study 2: class MoveToBeacon
The MoveToBeacon class is a bot written specifically for solving the mini game MoveToBeacon. This mini game is very simple; you have one marine and you need to move it to a beacon, a highlighted area on the map. The marine and beacon are always within one 'game screen' so you don't need to scroll/pan around the map to find the beacon. When the marine steps onto the beacon, the agent receives a reward 1 and the game restarts with the beacon in a new place. Every step taken that does not result in the marine walking onto the beacon the agent receives a reward of 0.
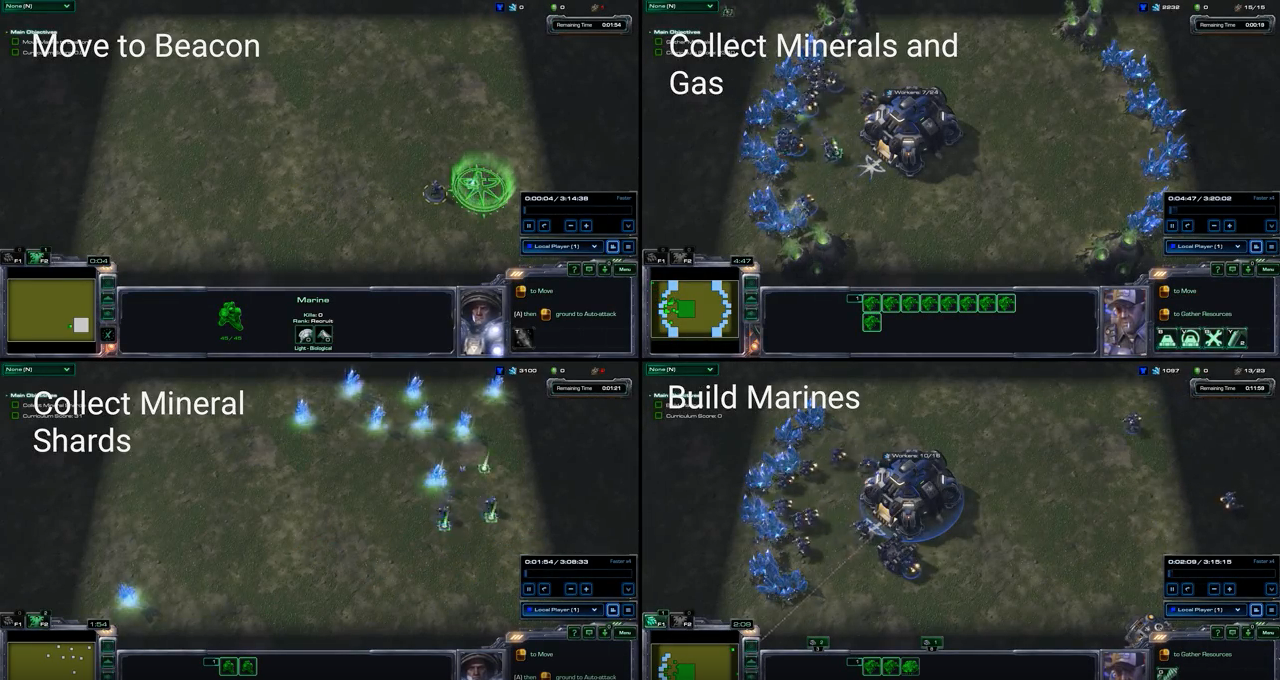
Youtube video of four of the mini games, including the MoveToBeacon one. The video is not embedded, because the code to do that will inject tracking scripts and I don't want to subject my dear visitors to such nonsense. Click here to watch it on Youtube.
Here's the whole first part of the pysc2.agents.scripted_agents module, which contains some imports, some constant definitions and the MoveToBeacon class:
import numpy

from pysc2.agents import base_agent
from pysc2.lib import actions
from pysc2.lib import features

_PLAYER_RELATIVE = features.SCREEN_FEATURES.player_relative.index
_PLAYER_FRIENDLY = 1
_PLAYER_NEUTRAL = 3  # beacon/minerals
_PLAYER_HOSTILE = 4
_NO_OP = actions.FUNCTIONS.no_op.id
_MOVE_SCREEN = actions.FUNCTIONS.Move_screen.id
_ATTACK_SCREEN = actions.FUNCTIONS.Attack_screen.id
_SELECT_ARMY = actions.FUNCTIONS.select_army.id
_NOT_QUEUED = [0]
_SELECT_ALL = [0]


class MoveToBeacon(base_agent.BaseAgent):
  """An agent specifically for solving the MoveToBeacon map."""

  def step(self, obs):
    super(MoveToBeacon, self).step(obs)
    if _MOVE_SCREEN in obs.observation["available_actions"]:
      player_relative = obs.observation["screen"][_PLAYER_RELATIVE]
      neutral_y, neutral_x = (player_relative == _PLAYER_NEUTRAL).nonzero()
      if not neutral_y.any():
        return actions.FunctionCall(_NO_OP, [])
      target = [int(neutral_x.mean()), int(neutral_y.mean())]
      return actions.FunctionCall(_MOVE_SCREEN, [_NOT_QUEUED, target])
    else:
      return actions.FunctionCall(_SELECT_ARMY, [_SELECT_ALL])
Wow, this looks way more complicated, right? Calm down, it's fine! Take a deep breath, relax, and we'll work this through together.
First off, we import numpy:
import numpyThe convention is to do import numpy as np. Which is what they do in pysc2.lib.features so likely an example of different people coding different parts and they haven't really consolidated the code base properly. Which is why we're doing this tutorial/documentation because the whole thing feels slightly unfinished. Doesn't really matter though, it's just code nerdery. If you didn't know, numpy is a library for mathematical functions. Linear algebra. Matrices. You know, stuff you calculate other stuff with.
Next up, we import the base_agent class:
from pysc2.agents import base_agentThat one we know! It's the class we looked at earlier, so we're familiar with what this does.
highfive!
Moving on:
from pysc2.lib import actions
from pysc2.lib import features
We went through the action module earlier, as it's used in the BaseAgent class. We need it to be able to call and perform actions. The features module contains information about the feature layers; the observations we/the agent can make. This is not strictly needed, as we could enter things manually, but as you'll see presently, this way we make the code more flexible/dynamic.
Now, let's go through the constant definitions one by one.
_PLAYER_RELATIVE = features.SCREEN_FEATURES.player_relative.indexHere we assign a variable for the index of feature player_relative. If you recall from earlier, the screen features can be accessed from the obs.observation dictionary like so:
obs.observation["screen"][5] # where 5 is the id for player_relativeBasically, getting the index from the features module like this and assigning a variable to it is equal to us just doing:
_PLAYER_RELATIVE = 5So what is player_relative you ask? Well, if we look in the official documentation, the screen feature player_relative means;
player_relative: Which units are friendly vs hostile. Takes values in [0, 4], denoting [background, self, ally, neutral, enemy] units respectively.
So, what we get from player_relative is a matrix of size (84, 84) representing the game screen, where 0 is background, 1 is self and so on.
Now that you know that, the following three lines should be fairly obvious:
_PLAYER_FRIENDLY = 1
_PLAYER_NEUTRAL = 3  # beacon/minerals
_PLAYER_HOSTILE = 4
Here we assign variables/constants to the relevant features we are interested in to solve the MoveToBeacon mini game. Well, actually the hostile part is not used but it is defined here as scripted_agent.py also contains classes for two other mini games. We'll get to those later. So, the two variables we are interested in right now are _PLAYER_FRIENDLY and _PLAYER_NEUTRAL.
_NO_OP = actions.FUNCTIONS.no_op.idRemember earlier when we used the terminal to find the no_op action in the list of all actions? Here, if we know the name of the action we want to use, we can get its id (0) by using the actions module. This way, as long as this action will be called no_op in the future, we don't need to remember its specific id number. It's also easier to read the code with a variable name than numbers everywhere.
_MOVE_SCREEN = actions.FUNCTIONS.Move_screen.idThe Move_screen action is not self explanatory, or at least it wasn't for me at first. It could mean move the game screen, which is what I first thought it meant. But actually, it means moving a selected unit to somewhere on the current screen. We can figure this out by looking at the definition in our terminal window:
$ python3 -m pysc2.bin.valid_actions | grep "Move_screen"Which gives us the output:
19/Scan_Move_screen                                   (3/queued [2]; 0/screen [84, 84])
331/Move_screen                                        (3/queued [2]; 0/screen [84, 84])
In our case, it's the 331 we're looking for. To the right we see that it takes two arguments; queued and screen. The first is a boolean and indicates if the action should be taken now or after previous actions (more on that later). The second argument is a point/pixel on the screen, which is (84, 84) pixels big. So since it's a single pixel being asked for, it must be moving a unit to somewhere on the current game screen. And actually, this makes sense, as if we think about the feature layers, we have the two main categories of minimap and screen, remember? This Move_screen command is likely the "move" command on the current "screen". If that's true there should be a Move_minimap as well. Let's see:
python3 -m pysc2.bin.valid_actions | grep "Move_minimap"
20/Scan_Move_minimap                                  (3/queued [2]; 1/minimap [64, 64])
332/Move_minimap                                       (3/queued [2]; 1/minimap [64, 64])
Hypothesis correct, yay! Let's move on.
_ATTACK_SCREEN = actions.FUNCTIONS.Attack_screen.idThe Move_screen command has the advantage of being used as an example in Deepminds documentation. Attack_screen is not. But the parameters look the same as Move_screen:
12/Attack_screen (3/queued [2]; 0/screen [84, 84])So, this should be the command to attack somewhere on the screen. In StarCraft II, if you press attack and then click a unit, that unit will be attacked. Quite obvious, I know. However, if you click attack and then somewhere on the screen, your unit(s) will go towards that point and attack anything they encounter on the way.
_SELECT_ARMY = actions.FUNCTIONS.select_army.idSince you can have both army units and worker units in SC2, this command selects all army units which is useful when you want to consolidate all your army units or cannot select an area on the screen with the mouse without selecting workers. It only has one parameter:
7/select_army (7/select_add [2])I had to look through pysc2.lib.actions to figure out what this was exactly, but it's a boolean denoting whether to add all army to current selection (True) or select all army units regardless of what is currently selected (False). So if you have a few workers selected and use select_army with the True flag, you'd have all army units and those workers selected.
_NOT_QUEUED = [0]Here we create a variable for the parameter of the current action not being queued. As previously stated, I'm not sure how this queue works. In pysc2.lib.actions we find that:
"""queued: Whether the action should be done now or later."""and
queued=ArgumentType.enum([False, True]), # (now vs add to queue)So, 0 (or False) as assigned to _NOT_QUEUED means perform the action now, while True (1) means add to the queue. It could be that actions in the queue are automatically performed if the agent class step function is called without an action being returned. Could also be that actions in the queue are performed the next time the agent sends a no_op. And another possibility is that this queue is only active during the same step, so that you can put a bunch of actions together and send them. Guess we need to experiment to know more, and I'll just move on for now because I don't think we need to worry too much about it at this point.
_SELECT_ALL = [0]The final constant defined is the parameter for the above mentioned _SELECT_ARMY action. _SELECT_ALL is not a great name, as 0 (False) means select all army units without adding current selection. Then again maybe the variable name works fine, if you read it as "select all army". Anyway. Now it's finally time for the actual class MoveToBeacon!
If you want, take a breath and go pee or something. We got this far, now prepare for the real stuff.
class MoveToBeacon(base_agent.BaseAgent):
  """An agent specifically for solving the MoveToBeacon map."""
The class definition. We inherit from the BaseAgent class. Not much more to say.
def step(self, obs):
  super(MoveToBeacon, self).step(obs)
We need to define the step function, as this is where all of our bot's behavior happens. It gets the obs variable as input which is the variable containing all of the observations for that step. Then we call the same function in the parent class (BaseAgent) using super. Why do we call the parent function? Well, if you remember from before (and if you don't just scroll up and look) the BaseAgent increases number of steps and reward every step. Using super here we can do that without explicitly writing those two lines ourselves. You can read more about super on stackoverflow.
Let's look now at the entire rest of the code block and then break it down:
if _MOVE_SCREEN in obs.observation["available_actions"]:
  player_relative = obs.observation["screen"][_PLAYER_RELATIVE]
  neutral_y, neutral_x = (player_relative == _PLAYER_NEUTRAL).nonzero()
  if not neutral_y.any():
    return actions.FunctionCall(_NO_OP, [])
  target = [int(neutral_x.mean()), int(neutral_y.mean())]
  return actions.FunctionCall(_MOVE_SCREEN, [_NOT_QUEUED, target])
else:
  return actions.FunctionCall(_SELECT_ARMY, [_SELECT_ALL])
There's an outer if/else here, if _MOVE_SCREEN in obs.observation["available_actions"]. The "available_actions" contains, well, all available actions at this current observational step. If no units are selected, the move command will not be available. Makes sense, right? So if the move command is not available, we have no selected units, hence the else: return actions.FunctionCall(_SELECT_ARMY, [_SELECT_ALL]) as that will select all your army units. In the current context, the MoveToBeacon mini game, that means our lonely marine.
Now, if we have our marine selected, we want to move it to the beacon. How do we find this beacon?
player_relative = obs.observation["screen"][_PLAYER_RELATIVE]
neutral_y, neutral_x = (player_relative == _PLAYER_NEUTRAL).nonzero()
We start on the first line here by getting the (84, 84) matrix for _PLAYER_RELATIVE. If you remember from before, that will show 0 for background, 1 for where the marine is (self) and 3 where the beacon is (neutral). The next line gives us all the points in the (84, 84) matrix that are equal to 3 (equal to _PLAYER_NEUTRAL) and that are not zero. As an example, consider the following small matrix:
matrix = numpy.array([
[0, 1, 0, 0],
[0, 0, 3, 3],
[0, 0, 3, 3],
[0, 0, 0, 0]
])
(if you have your terminal ready you can open the python interactive prompt or use ipython to follow along and experiment for yourself if you're unsure of how this works)
Imagine this 4x4 matrix is the game screen, instead of the usual 84x84 matrix we're actually working with. Each number in this 4x4 matrix is a pixel. And we see that the beacon covers a total of 4 pixels, the pixels saying 3. The marine covers one pixel in the upper left, that's the 1. If we use nonzero on this we get:
In: matrix.nonzero()
Out: (array([0, 1, 1, 2, 2]), array([1, 2, 3, 2, 3]))
We get two arrays for the positions of nonzero values. The left array contains the row values and the right array contains the column values. So the marine for example is at position (0, 1) and can be accessed directly from matrix like this:
In: matrix[0][1]
Out: 1
But we only want the beacon, we don't care about where the marine is. So we can do:
In: numpy.nonzero(matrix == 3)
Out: (array([1, 1, 2, 2]), array([2, 3, 2, 3]))
OR
In: (matrix == 3).nonzero()
Out: (array([1, 1, 2, 2]), array([2, 3, 2, 3]))
Now we get only the pixels where the beacon is! So to get the "upper-left" 3 we can do:
In: matrix[1][2]In the main code above, they've said:
neutral_y, neutral_x = (player_relative == _PLAYER_NEUTRAL).nonzero()Why y before x? Because usually if you look at most graphs, you put x on the horizontal line and y on the vertical. Since the left array are rows and the right array columns, by doing this we can think better since it'll be like any regular graph. Or something.
Get it? Good. Otherwise, play around on your own with these functions, it helps when trying to get stuff like this to experiment you know.
Now that we've looked for where the beacon is, there's a test in case there's no beacon found:
if not neutral_y.any():
  return actions.FunctionCall(_NO_OP, [])
If no beacon was found on the screen - if there are no 3s in the matrix - we send back a no_op action.
If the neutral_y did contain at least one 3 then we move onto the final two lines of code:
target = [int(neutral_x.mean()), int(neutral_y.mean())]
return actions.FunctionCall(_MOVE_SCREEN, [_NOT_QUEUED, target])
The target is of course the beacon, and here we find the middle of that beacon by taking the mean value of the x and y coordinates where 3s were found. In the 84x84 matrix, the beacon covers around a 10x10 area I think.
Finally, we return the action _MOVE_SCREEN with the parameters _NOT_QUEUED and the coordinates target.
That's it! Now we know how the scripted agent MoveToBeacon works. More or less :)
In the next post/chapter, we shall use what we learned to create an agent that learns how to solve this game without us specifying how it should do that. With the assumption that we basically only need the same few actions and observations that the MoveToBeacon scripted agent uses, we will build or own bot using reinforcement learning. Maybe this assumption is wrong and we need more stuff, but whatever, we'll just hack that if/when we get there!
Stay tuned for the next episode!